Extent Reports is quite a popular tool among Automation Testers. As we know that Test Reporting is a fundamental need of any automation framework and a must implement activity in Quality Assurance. Selenium although provides in-built reports with the help of Testng Or Junit and it contains quite the required details about the test cases BUT, the challenge is that they are not very customizable and presentable to present in-front of the management.
Hence, it comes Extent Reports to rescue. It is highly customizable Html Reporting and have several benefits over Selenium in-built reports and this what we gonna learn in this tutorial to “How to Generate Reporting in Selenium Webdriver using Extent Reports?”

Check out: JAVA 13 TUTORIAL with examples (Latest 2020)
In this tutorial, we are going to cover below topics:
Let’s begin:
1. Advantages of using Extent Reports
Key Points:
- Fully customizable HTML report with pie chart representation.
- Displays time taken by the test suite execution.
- Capability of adding screenshot with every step.
- Can be integrated with other Unit Testing Frameworks like JUnit & TestNG
- Test Suite level displays complete details about Tests and it’s steps.
- Can display Test Environment details on the Report.
- Shows percentage coverage in the report.
- Test Status (Pass/Fail) can be seen in the Pie Chart format.
2. How to Setup Extent Reports in a Project
In order to start the implementation of Extent Reports, we need to set up the environment first. For this reason, this tutorial will explain and help to set up the prerequisite and required dependencies in Eclipse.
Maven based Project:
If you are using Maven as the build tool for you project, use below mentioned dependency and add it into the POM file:
1 2 3 4 5 | <dependency> <groupId>com.relevantcodes</groupId> <artifactId>extentreports</artifactId> <version>2.41.2</version> </dependency> |
OR
If you are using standalone project then download the extent report jar from this location and add it into your project’s class-path.
3. How to use and implement in Selenium Framework
Extent Reports implementation is very easy. You just need to take care of 5 following operations and that’s it and you are good to go.
- startTest
- log
- endTest
- flush
- close
Let’s see the syntax of each of the above operation:
1. startTest
1 2 3 | ExtentReports report = new ExtentReports(reportFilePath+".html", false); ExtentTest test = report.startTest("Extent Report Sample"); |
1 2 3 4 | test.log(LogStatus.PASS,”Test Passed”); test.log(LogStatus.FAIL,”Test Failed”); test.log(LogStatus.SKIP,”Test Skipped”); test.log(LogStatus.INFO,”Test Info”); |
1 | report.endTest(test); |
1 | report.flush(); |
Well, Let’s see the sample complete implementation of Extent Reports:
1 2 3 4 5 6 7 8 9 10 11 12 13 14 15 16 17 18 19 20 21 22 23 24 25 26 27 28 29 30 31 32 33 34 35 36 37 38 39 40 41 42 43 44 45 46 47 48 49 50 51 52 53 54 55 56 57 58 59 60 61 62 63 64 65 66 67 68 69 70 71 | import java.io.File; import java.sql.Timestamp; import org.openqa.selenium.WebDriver; import org.openqa.selenium.chrome.ChromeDriver; import org.testng.annotations.AfterClass; import org.testng.annotations.BeforeClass; import org.testng.annotations.Test; import com.relevantcodes.extentreports.ExtentReports; import com.relevantcodes.extentreports.ExtentTest; import com.relevantcodes.extentreports.LogStatus; import io.github.bonigarcia.wdm.WebDriverManager; public class ExtentReportsSample { WebDriver driver = null; public ExtentReports reports; public ExtentTest test; File reportDir = new File(System.getProperty("user.dir")); String reportFilePath = reportDir.toString() + "/ExtentReports/"; @BeforeClass public void beforeClass() { WebDriverManager.chromedriver().setup(); driver = new ChromeDriver(); reports = new ExtentReports(reportFilePath + this.getClass().getSimpleName() + getRandomNumber() + ".html", false); test = reports.startTest("Extent Report Sample"); } @Test public void test_with_extentReporting() { driver.get("https://techndeck.com/"); driver.manage().window().maximize(); String title = driver.getTitle(); if (title.contains("Techndeck")) { test.log(LogStatus.PASS, "Validate title contain text: 'Techndeck'", "Text exist"); } else { test.log(LogStatus.FAIL, "Validate title contain text: 'Techndeck'", "Text doesn't exist"); } } @AfterClass public void afterClass() { driver.close(); driver.quit(); reports.endTest(test); reports.flush(); reports.close(); } public long getRandomNumber() { Timestamp timestamp = new Timestamp(System.currentTimeMillis()); return timestamp.getTime(); } } |
Once you run the above sample example, and go into the directory in which you’ve saved the report. You’ll find a file gets created there. In my case, it’s in
/Users/d33p4k/javapractice/ExtentReports (it will be different for you)
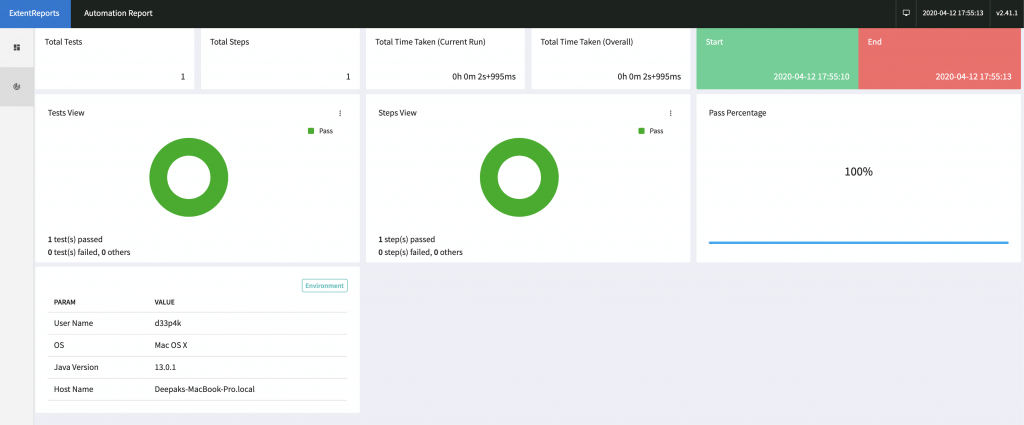
Now, once you open the report file present in that folder, it should be like the following ones:
Detail Report

Summary Report

That’s it. It’s so easy to implement Html Based customized reporting in Selenium Webdriver with the help of Extent Reports.
Happy Learning!!!
4. Resources
Extent Report Implementation – Software Testing Help
Extent Reports Implementation in Selenium Webdriver...!!! Share on XCheckout other useful tutorials, take a look:


