

In this post, we are going to see “How to set JAVA_HOME as environmental variables in Windows 10 Operating System?”

Simple step by step process to set JAVA_HOME in Windows 10, Share It... Share on X
Prerequisite:
You already have installed the Java Development Kit (JDK) in your machine. Now, you can proceed with setting up the JAVA_HOME environment variable to point to the JDK installation directory.
Following are the steps to set JAVA_HOME in Windows:
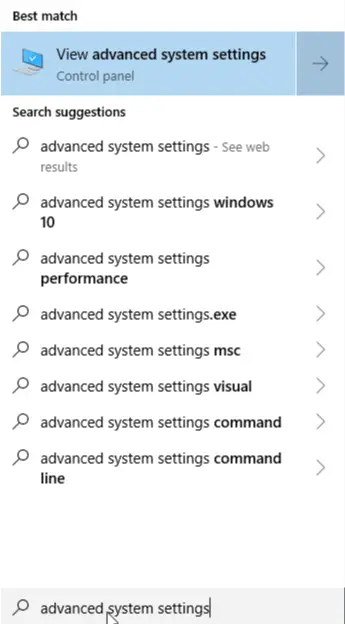
1. Type ‘advanced system settings’ in the search box present beside the Windows icon in the task bar and then click ‘View advanced system settings’ as shown in the below screenshot.
2. ‘Settings’ dialog will open and then, click ‘Advanced’ tab.
3. Click ‘Environment Variables’ button present at the bottom on the ‘Advanced’ tab.
4. ‘Environmental Variables’ window will open. Then, click ‘New’ present under System Variables.
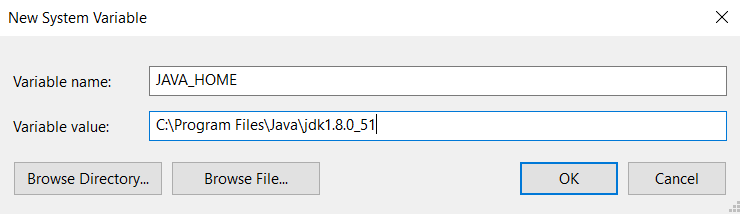
5. Enter ‘JAVA_HOME’ in ‘Variable name’ field and enter JDK location in ‘Variable value’ field. JDK location is nothing but JDK directory created under Program Files during JAVA installation. Lets assume, you had installed jdk 1.8.0_51 in your windows OS then the installation path of JDK should be C:\Program Files\Java\jdk1.8.0_51 (NOTE: this path should be as per your operating system).
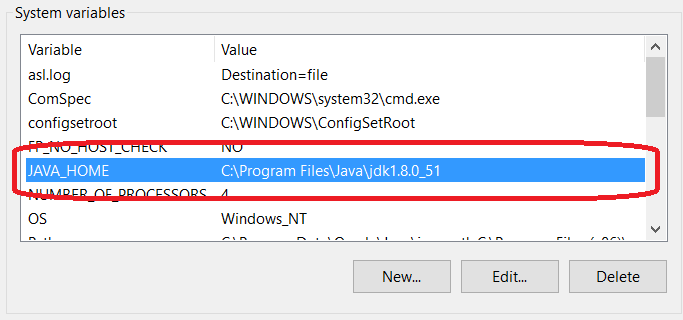
6. Click OK and you will see the JAVA_HOME listed in the system variable as in the screenshot below:
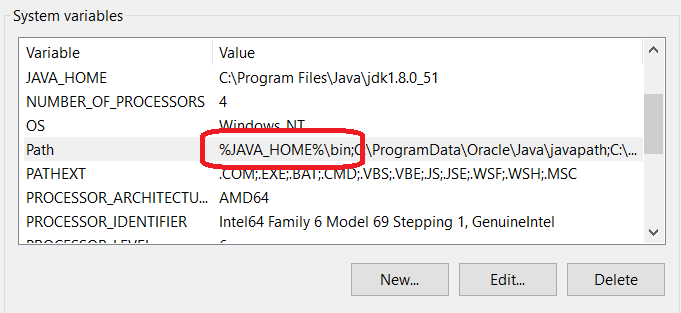
7. Under System Variables, select Path system variable and click the Edit button.
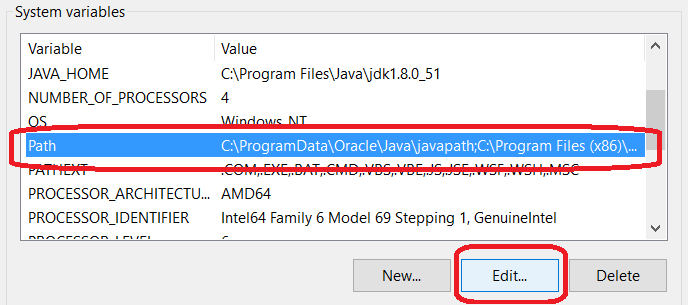
8. As you can see in the above screenshot, Path variable already has some value, so what you need to do is just add the %JAVA_HOME%\bin; at the beginning of this value and click OK.
9. Now, Path variable should be updated with value inserted above in the below screenshot.
10. Now, click Apply and then OK.
NOTE:
You might need to restart Windows if changes don’t reflect.
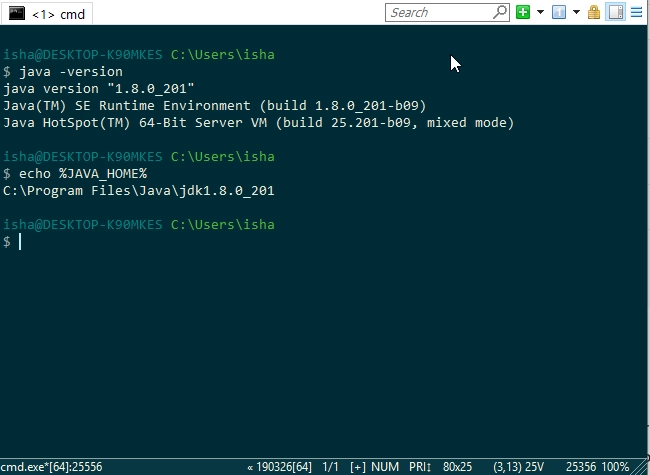
Once, you are done with all the steps, lets check if it’s perfectly setup. Lets launch ‘Command Prompt’ and run below commands one after the other and you would see results as shown in below screenshot:
command 1: java -version
command 2: echo %JAVA_HOME
That’s it, it’s that simple to set JAVA_HOME in Windows 10 :)
Simple approach to set Java_HOME in windows, Share It... Share on X
If you like this post , please check out my other useful blog posts:
Other Useful References:


Nice article.
By the way, if you’re interested in submitting any similar articles, feel free to message me over at theserverside and we’d love to publish them. We publish lots of content on similar topics, as you can see:
https://www.theserverside.com/feature/How-to-set-JAVA_HOME-in-Windows-and-echo-the-result
https://www.theserverside.com/blog/Coffee-Talk-Java-News-Stories-and-Opinions/How-to-fix-common-JAVA_HOME-errors-quickly
Thanks for appreciating the article Cameron.
Ofcourse, I’ll share some stuff soon. Thanks again.
Thanks
Thanks for sharing interesting and informative post.
Thank you for liking the article.
Thanks